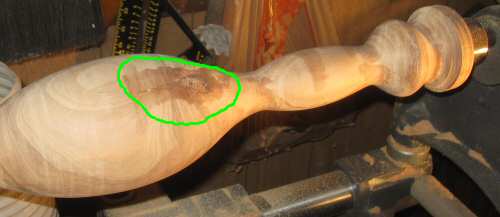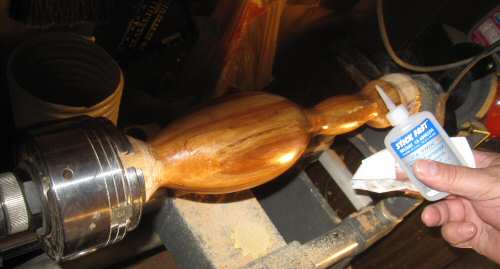

 In the heat of the summer it is fun sometimes just to turn something that doesn't require a lot of precision or thought. Fish whackers serve the purpose admirably. I got an email from a guy who wanted a short, squat whacker which looked almost cartoonish from the drawing provided. A no-hurry job, just sometime late in 2010. Didn't care about the type of wood. Didn't care about the handle, other than a hole drilled in it to run a piece of leather through so the whacker could be hung from a hook Take a trip out to the limb dump and see what the storms have recently provided. In this case, it was some nice chunks of apple tree. Apple by the way, makes for really tough fish whackers and usually has some decent character as well. Try for a piece about two feet long. Longer is better than shorter. Turning fish whackers from green wood takes an extra step or two and I've gotten pretty good at the green wood microwave technique. Unfortunately, this is a little large for the average microwave so we shall use an alternate method for drying the whacker.  The log is mounted using a face plate. The gear reducer knocks the speed down to about 100 rpm. Turn up the speed as the log gets rounder. Standard stuff.  One thing worth mentioning since this is green wood we are talking about: Try to choose logs where you can turn out most if not all of the inner heart wood. Cracks will start from the center and radiate out as the wood dries. The more of the heart wood you can remove, the less chance of cracking. I always spend a little extra time going through the log pile to try to find a log like the one pictured.  I have to knock off for the day because it is getting too frigging hot in the garage so before I vacate the premises, the blank has to go into temporary storage because remember, this is green wood fresh off the tree. Get a good sized rag and wet it with water. Wet the blank as well. A spray bottle also works well for this.  Cover the green blank with the rag..........  ...and then split a plastic kitchen trash bag and cover all with the bag. You now have synthetic bark! This will keep the green fish whacker blank form splitting until it cools down again. In humid climates, this kind of storage is good for a couple days. In arid climates like northern Nevada, the blank should be wetted down daily.  A couple days later and about 20 degrees cooler, I went back to work on this with the Sorby gouge. I have a few words of caution about this particular gouge.  If you watch the Sorby video where the guy turns a nice, dry piece of pine down to a dowel in about 1 minute flat with this tool, don't expect similar results when turning down a green log with the bark still on it. Instead, expect a couple loud clanks and thumps and if you are don't have a good hold on the tool, an unexpected launch. This has to be one of the most fickle tools I have ever used. If you want to use it on green wood, you first have to get the wood round using another tool and ensure most if not all of the bark is removed. Once you have the round truly round, this tool can make short work of the rest. But.......... A. Due to the grind, the gouge has a tendency to catch very easily and you can end up tearing out much more than you planned in a heartbeat. B. Due to the grind or because the wood is green, the cutting edge tends to clog itself with small shavings where you have to pull the tool away and remove the chip stuck in on the cutting edge. This is particularly true if there is bark still on the round. That gets annoying.  However, once the round is round and most of the bark is removed, this gouge peels wood like nothing else in my tool collection.  Since this eventual fish whacker is green, I'm going to leave an extra inch or so on the preliminary turning.  That was some pretty good guesswork. Don't have to turn this down much further.  A nice thing about apple wood, other than it's cheap, is the heartwood is dark and provides a nice contrast to the finished piece. The problem with apple is trying to find pieces without worm holes and frequently with worms still in them.  Uh oh. I uncovered major rot. I can push this pen in about 1/2" and the streak runs about 10". At least now I won't have to debate with myself which end will be the handle. Maybe I can turn this out.  A magic marker helps to lay out the approximate dimensions.  In the middle of blocking the piece out, another 'crack' appears and it looks like there is webbing in it....  I went inside to get a drink of water and this insect, looking freshly hatched was sitting near by drying its wings. Wonder where it came from..........  Anyway, the newly turned fish whacker looks pretty nice. This is as far as I want to take it down while still green.  I'm trying this on for size. The eventual owner has large hands, probably larger than mine so if it ends up being a bit out sized for me, that should be about right. By the way, this is a good idea when making whackers, clubs, bats etc. - get an idea of the size of the client's hands before going too far down this road. Same applies to pens and the like.  How irritating. Now is not a good time to discover a broken face plate screw left in the piece.  How about that! I can nuke it if I so choose but in this case I am not going to because time is on my side.  In this case I am opting for option B. Option B involves coating the newly turned fish whacker with a thick coat of Tung oil, wrapping and placing the piece in a carefully controlled environment. Another reason for choosing option B is I want to kill any bugs still inside the piece and what works is to seal it up tight, restrict air and let the piece heat up and cool down. Believe it or not, microwaving does not always kill bugs. Option B will.  My theory here is, and it is only a theory, tung oil is a good penetrating oil. The piece soaks up the oil and the oil hardens, considerably slowing moisture loss from green wood as it dries. I could also opt for a heavy latex paint, but it is rather hard to do a visual on a painted piece. I'm letting this dry for an hour or so. I think this is going to turn out to be an attractive piece.  Don't forget to squeeze all the excess air out of the bottle when finished. Excess air causes the oil to crust up and harden off over time. Marbles also work well for removing empty space.  Carefully controlled storage consists of several paper bags, one plastic bag and some tape.  I use at least three paper bags. Bag the item from one end, then the other end and so on.  And here we have the finished product.......kind of looks like a miniature corpse. Tape the miniature corpse tightly. Now all I need is a carefully controlled environment.........  I think in the back of the truck for a couple months should suffice. The date is 06/29/2010. To be continued........  7-24-2010 I didn't weigh this initially but as of July 24, the green fish whacker is not so green anymore and weighs an overall 3.0 pounds. It is drying fairly quickly and there have been no cracks or warpage - yet. The blank itself is dry to the touch but moisture is still showing up on the plastic wrapping. September, 2010 - Continued  The wacker dried well with one exception. There is an area of pith running along the entire lenth of the piece. CA Glue and sawdust fill in the voids. Time to start turning down to size.  This is looking about right.  This area is starting to cause me some grief. The knot and one length of pith keep intruding on my master plan. I dug out some of the pith, back-filled with sawdust and CA glue. and am letting the area dry somewhat naturally. I don't like where the knot ended up because this would be the weak spotl. I dug into the knot a ways and filled with sawdust and CA glue. Slowly. This should work outl.  A major chunk of the end of the handle broke out - totally pithy. This resulted in a major repair job. I don't know what it is, but when CA glue hits enough rot, it gives off smoke. You don't want to breathe this. It is included for 'cool picture' taking purposes only.  The knot is fixed but because of that, the area is stained darker than the rest of the fish wacker and thusly, it is going to stand out.  The answer to this is to stain everything using thin ca glue. Let it dry overnight.  The final finish is a coat of Minwax Pecan finish. Pecan works well for enhancing apple wood.  This ought to work out about right as the grip is a little large for me. There must be some big fish in those rivers and lakes up north. I decided not to drill a hole in the piece. Someone else can do that. |
